Introduction:
Holograms, once considered the stuff of science fiction, have become a fascinating reality in the world of technology and visual arts. The allure of holographic images and displays captivates our imagination, creating three-dimensional illusions that seem to defy the constraints of the physical world. In this comprehensive guide, we will delve into the science, techniques, and DIY methods for creating holograms, exploring both the principles behind holography and practical steps for making your own holographic projections.
Section 1: Understanding the Science of Holography
- Defining Holography:
- Holography is a photographic technique that records light patterns to create three-dimensional images. Unlike traditional photography, which captures only intensity and color, holography also records the phase of light waves, enabling the recreation of a realistic three-dimensional scene.
- Basic Principles of Holography:
- Holography relies on the interference pattern created by the interaction of laser light with an object and a reference beam. This interference pattern, captured on a photosensitive surface, contains information about both the amplitude and phase of the light, allowing the recreation of a 3D image when illuminated.
Section 2: DIY Methods for Creating Holograms
- Creating a Holographic Image:
- While professional holography involves sophisticated equipment and lasers, DIY holograms can be crafted using more accessible methods. One such method involves creating holographic images on photosensitive materials using a laser and a simple set-up.
- Materials Needed:
- Gather materials such as laser pointer, photosensitive holographic plates or film, darkroom or a dark space, and developer and fixer solutions for processing the holographic plate.
Section 3: Step-by-Step Guide for Creating a Hologram
- Setting Up a Darkroom:
- Choose or set up a darkroom to avoid exposure to unwanted light during the hologram creation process. Complete darkness is crucial for the proper development of holographic images.
- Preparing the Photosensitive Plate:
- Handle the holographic plate with care to avoid contamination. In darkness, coat the plate with a thin layer of developer solution and let it dry. Once dry, place the plate in a holder or rig.
- Setting Up the Laser and Object:
- Position the laser and the object you want to holograph on a stable surface. The laser should be coherent and aligned, and the object should be well-lit to create clear holographic interference patterns.
- Exposing the Holographic Plate:
- Turn on the laser, allowing its light to interact with the object and create interference patterns. Direct the laser light onto the prepared holographic plate for the necessary exposure time, ensuring stability to avoid blurriness.
- Developing the Holographic Plate:
- After exposure, carefully transfer the plate into the developer solution. Swirl the plate gently to ensure even development. Once developed, transfer the plate to the fixer solution to stabilize the holographic image.
- Drying and Illumination:
- Allow the holographic plate to dry completely in darkness. Once dry, the holographic image is latent on the plate. To reveal the hologram, illuminate the plate with a laser beam at the same angle as during exposure.
Section 4: Making a Holographic Projector
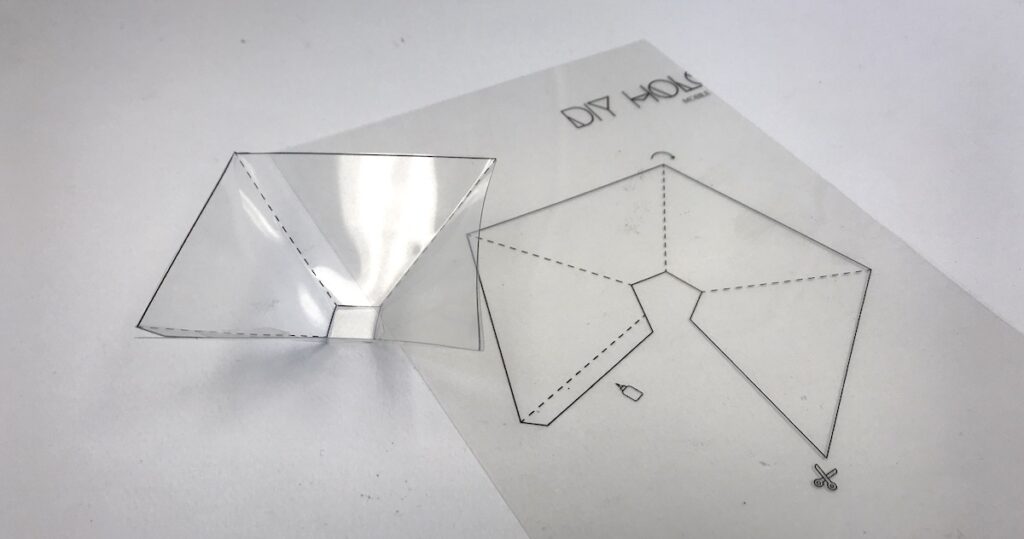
- DIY Holographic Projector:
- Creating a holographic projector for visualizing holographic images involves using transparent materials like acrylic or glass and carefully aligning them to project the reconstructed holographic image.
- Materials Needed:
- Acrylic or glass sheets, a laser, holographic film, and a stable frame for holding the sheets at the right angles are essential for constructing a basic holographic projector.
Section 5: Step-by-Step Guide for Making a Holographic Projector
- Constructing the Frame:
- Build a stable frame to hold the acrylic or glass sheets at the desired angles. The angles are critical for projecting the holographic image correctly.
- Attaching the Holographic Film:
- Affix the holographic film onto one of the transparent sheets. The film should be positioned to allow light to pass through it and create the holographic projection.
- Positioning the Laser:
- Set up the laser to illuminate the holographic film. Adjust the angle and distance of the laser to ensure optimal projection quality.
- Aligning the Sheets:
- Align the acrylic or glass sheets to create the necessary reflections and refractions for projecting the holographic image. Precision is key to achieving a clear and vivid holographic projection.
- Testing and Adjusting:
- Test the holographic projector by illuminating it with the laser. Make adjustments to the angles, positions, and distances to optimize the clarity and size of the projected holographic image.
Section 6: Applications and Future Developments
- Art and Entertainment:
- Holography has found applications in art installations and entertainment, creating mesmerizing visual experiences. Artists and performers use holographic technology to push the boundaries of traditional visual displays.
- Scientific and Medical Imaging:
- In scientific and medical fields, holography enables detailed 3D imaging. Holographic techniques provide insights into complex biological structures and aid in medical diagnostics.
- Holographic Displays:
- Ongoing research focuses on developing holographic displays for everyday use, potentially replacing traditional screens with glasses-free 3D holographic images. This innovation could revolutionize the way we interact with digital content.
- Security and Authentication:
- Holography is widely employed in security features for documents, credit cards, and packaging. The unique optical properties of holograms make them challenging to replicate, enhancing security and authentication measures.
Section 7: Challenges and Considerations
- Equipment Limitations:
- DIY holography has limitations compared to professional holography equipment, resulting in lower resolution and quality. Understanding these limitations is crucial for managing expectations.
- Precision and Stability:
- Achieving precise alignments and maintaining stability during hologram creation are critical. Any movement or misalignment can result in distorted holographic images.
Section 8: Ethical Considerations
- Responsible Use of Holographic Technology:
- As holographic technology advances, ethical considerations arise, particularly in areas such as deepfakes and holographic projections of individuals. Responsible use and regulation are essential to address potential misuse.
Section 9: Conclusion
Crafting holograms, once the realm of scientific laboratories and futuristic visions, has become an accessible venture for enthusiasts and artists alike. This comprehensive guide has illuminated the principles of holography, provided step-by-step instructions for creating holographic images, and offered insights into constructing a basic holographic projector. As technology continues to push the boundaries of visual experiences, exploring the art and science of holography opens up a world of possibilities. Whether for artistic expression, scientific exploration, or technological innovation, the journey into holography invites us to embrace the limitless potential of three-dimensional illusions within our grasp.