Windows Backup and Restore is a built-in feature in Windows operating systems that allows users to create backups of important files, folders, and system images. It provides a convenient way to protect your data from accidental loss, hardware failure, or other unforeseen events by enabling you to restore files or recover your entire system to a previous state. This guide provides comprehensive instructions on how to use Windows Backup and Restore in Windows 10, covering essential features such as creating backups, restoring files, configuring backup settings, and managing backup storage:
Introduction to Windows Backup and Restore
Windows Backup and Restore (formerly known as Windows Backup and Restore Center) is a backup and recovery feature available in Windows operating systems. It enables users to create backups of files, folders, and system images, allowing them to restore data in case of data loss or system failure. By regularly backing up your data, you can safeguard important files and ensure peace of mind knowing that you can recover them if needed.
Getting Started with Windows Backup and Restore
- Accessing Backup and Restore:
- Click on the Start button (Windows icon) in the bottom-left corner of the screen.
- Type “Backup settings” in the search box and select “Backup settings” from the search results to open the Backup settings window.
- Setting Up Backup:
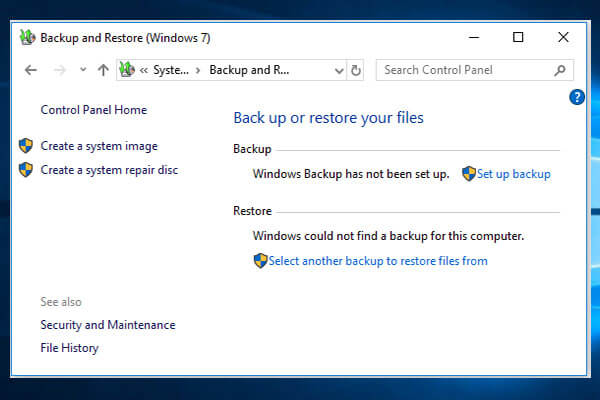
- In the Backup settings window, click on “Go to Backup and Restore (Windows 7)” to access the Backup and Restore control panel.
- Navigating Backup and Restore Interface:
- The Backup and Restore control panel provides options to create a backup, restore files from a backup, or change settings related to backup configuration and storage.
Creating a Backup
- Setting Backup Destination:
- In the Backup and Restore control panel, click on “Set up backup” to start the Backup wizard.
- Choose a location where you want to save your backup, such as an external hard drive, network location, or a separate partition on your computer.
- Selecting Files and Folders:
- Choose the files and folders you want to include in the backup. You can select specific libraries (Documents, Pictures, Videos) or customize selections by clicking on “Let me choose.”
- Scheduling Backup:
- Configure a backup schedule by selecting “Change schedule” and specifying how often you want Windows to create backups automatically (e.g., daily, weekly).
- Completing Backup Setup:
- Review the summary of your backup settings. Click on “Save settings and run backup” to initiate the backup process.
Restoring Files from Backup
- Accessing Restore Options:
- In the Backup and Restore control panel, click on “Restore my files” to open the Restore Files wizard.
- Selecting Backup Location:
- Choose the backup location where your files are stored (e.g., external drive, network location).
- Browsing Backup Contents:
- Browse through the backup folder to locate the files or folders you want to restore. You can use search filters or browse through specific dates if multiple backups are available.
- Restoring Files:
- Select the files or folders you want to restore. Click on “Restore” to restore them to their original location or “Restore to” to choose a different location.
- Completing Restore Process:
- Follow the on-screen prompts to complete the file restoration process. Windows will restore the selected files to their original or specified location.
Managing Backup Settings
- Changing Backup Settings:
- In the Backup and Restore control panel, click on “Change settings” to modify backup configuration options.
- Adding or Removing Files from Backup:
- Click on “Change what to back up” to add new files or remove existing files from the backup selection.
- Viewing Backup History:
- Click on “Manage space” to view the backup history and manage backup storage settings, including deleting older backups to free up disk space.
- Monitoring Backup Status:
- Monitor the status of backup operations and view detailed reports by clicking on “View details” in the Backup and Restore control panel.
Additional Tips and Considerations
- Backup Frequency:
- Schedule regular backups to ensure your data is up-to-date and protected against data loss or system failure.
- Storage Location:
- Choose a reliable and secure storage location for backups, such as an external hard drive or network location, to prevent data loss in case of hardware failure or computer theft.
- System Image Backup:
- Consider creating a system image backup to capture the entire system state, including installed programs and system settings, which allows for full system recovery in case of system corruption or hard drive failure.
- Testing Restorations:
- Periodically test the restoration process by restoring a few files or folders from backup to ensure that backups are functioning correctly and your data is recoverable.
Conclusion
Windows Backup and Restore provides a convenient and reliable solution for backing up and restoring files, folders, and system images in Windows 10. By following the step-by-step instructions and best practices provided in this guide, you can effectively use Windows Backup and Restore to protect your data, recover from data loss or system failure, and maintain system reliability and productivity.
Regularly review and update backup settings, monitor backup status, and perform test restorations to ensure your backups are current and your data remains secure. Take advantage of Windows Backup and Restore features to safeguard your valuable files and maintain peace of mind knowing that your data is protected against unexpected events.